Sonar Plugin Installation and Configuration for Eclipse IDE
Part 1 > Part 2 > Part 3 > Part 4
It is important to have at-least one project appearing in the SonarQube server's dashboard before staring this section.
(If you do not have projects in your SonarQube server, please follow the Part 2 - Continues Inspection With Sonar of this Article)
It is important to have at-least one project appearing in the SonarQube server's dashboard before staring this section.
(If you do not have projects in your SonarQube server, please follow the Part 2 - Continues Inspection With Sonar of this Article)
SonarLint Plugin
- This plugin is also available on the eclipse market place.
- You can visit market place and drag/drop the "install" button to your eclipse IDE. (It will start the installation process for you)
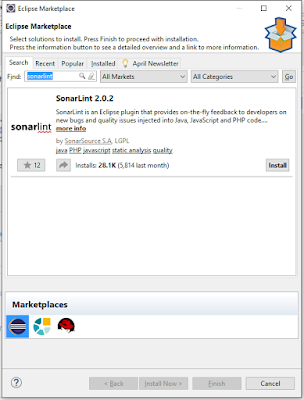
- Or else inside the eclipse IDE goto "Help" > "Eclipse Marketplace"
- Type "sonarlint" in the Find: section of the Eclipse Market place and hit enter.
- When search result appears, click on the "Install" button.
- When "Confirm Selected Features screen" appears, select "SonarLint for Eclipse" and "SonarLint for Eclipse Java Configuration Helper"
- Then click the Confirm button.
- When "Review Licence" screen appears select "I accept the terms of the license agreement" radio button and click on the Finish button.
- Eclipse will continue the SonarLint plugin installation.
- When it asks to restart the IDE to finish installation, allow it to do so.
- Once eclipse restarts, create a sample Java project and a sample project as shown below.
CoreJavaDemo (Project)
|--MySonar (Package)
|--HelloWorld.java (Class)
- Right click on the project and select "SonarLint" > "Bind to a SonarQube project"
- When "Bind Eclipse projects to SonarQube projects" screen opens, select Eclipse project (CoreJavaDemos) and Type a SonarQube project name (which is already existing in SonarQube Dashboard)
- If "Select a SonarQube server:" dropdown list does not have the localhost as a value, you should configure it with following values. To check whether the server is accessible, click on "Test server" button after providing the below details.
Server name : http://localhost:9000/
User : admin
Password : admin
- Finally goto "Window" > "Show View" and select "SonarLint Issues" view
- Now you SonarLint plugin will analyze the source-code which is being developed in the eclipse project and notify issues in real-time. (A Summary of issues will be displayed in SonarLint issues view)


