Tuesday, December 20, 2016

Dreamers and Realists

There are dreamers and there are realists in this world...


Dreamers Realists


You might think the dreamers will find the dreamers and the realists would find the realists to work with, but more often they are not. The truth is the opposite ...

Dreamers need the realists to keep them from souring too close to the sun ...

And the realists, without the dreamers they might not ever get off the ground ...


The important fact here is, you and I both are lucky to have these pumpkins and poppies in our teams.. (No matter what industry we are in...)

Wednesday, June 1, 2016

Continues Inspection with SonarQube / Sonar plugins Part 1

Introduction to SonarQube

Part 1 >  Part 2 > Part 3  > Part 4

This will be the first part of a series of posts on Continues Inspection / Code Quality Assessment with SonarQube and will cover the use case with installation / configuration details.

What is SonarQube? 


SonarQube is a central place to manage code quality. It visualizes reporting on and across projects and enables us to replay the past evolution of projects. If you are aware of code quality checking plugins such as checkstyle, findbugs, PMD, etc. SonarQube is found as a collection of these plugins and more.

SonarQube,
  • Analyzes source code and byte code.
  • Computes hundreds of metrics.
  • Provides moment-in-time quality snapshots (Associates metrics with analysis snapshots).
  • Gives trends of lagging and leading indicators
  • Tracks developers’ 7 deadly sins (Explained in below)
  • Shows the results in dashboards and widgets , which are accessible any browser.


What is Code Quality?


in Gibberish -
Code Quality is a collection of factors such as Usability, Maintainability, Error management and Efficiency of a code.


in Simple Language -
It is an Indicator about, How quickly developers can add business value to a software system.

Why Measure Code Quality?


Because,
  • A system is never “Finished”. (We don’t know where we need to modify it in the future)
  • You can not improve if you don’t measure
  • The Broken Windows Theory !
  • If system was a person, Source Code is the Heart of the System.


What to Measure as Code Quality?


The makers of SonarQube, SonarSource has introduced us 7 facts to Measure as Code Quality. They call them "The 7 Deadly Sins"
  1. Bugs and Potential Bugs
  2. Coding Standards Breach
  3. Duplication
  4. Lack of Unit Tests
  5. Bad Distribution of Complexity
  6. Spaghetti Design
  7. Not Enough or Too Many Comments


How to Measure Code Quality?


Of course that's where we use SonarQube. Its a tool for measuring the quality of code...

SonarQube is just a part of code quality management process. Code quality management process may also include,
  • Code Reviews (includes Code Freezes as well)
  • Pair programming, etc.
Code Freeze - If the current level of code quality is below than the acceptance level, new code generation will be stopped at a point. Then all team members will start working on improving the code quality until they reach the acceptable quality level. Only then the development shall begin again...
It is important to keep in mind that you should use the aforesaid quality management methods alongside SonarQube. If not your expectations on using this amazing tool might not be rightfully  achieved.  
"Start where you stand, and work with whatever tools you may have at your command, and better tools will be found as you go along" - George Herbert

SonarQube for every Programming Language?


  • SonarQube was initially developed for JAVA
  • Today it supports over 20+ languages (C, C++, Android, Java, JavaScript, etc.)
  • List of Supported Languages.

If you want to learn how to install and configure SonarQube > Part 2 - SonarQube Installation and Configuration
If you want to analyze your source code straight away > Part 3 - Continues Inspection With Sonar (The Sonar Way)
If you want to configure Sonar Plugin for eclipse > Part 4 - Sonar Plugin Installation and Configuration for Eclipse IDE

Saturday, May 7, 2016

Continues Inspection with SonarQube / Sonar plugins Part 4

Sonar Plugin Installation and Configuration for Eclipse IDE

Part 1 Part 2 > Part 3  >  Part 4

It is important to have at-least one project appearing in the SonarQube server's dashboard before staring this section.
(If you do not have projects in your SonarQube server, please follow the Part 2 - Continues Inspection With Sonar of this Article)

SonarLint Plugin


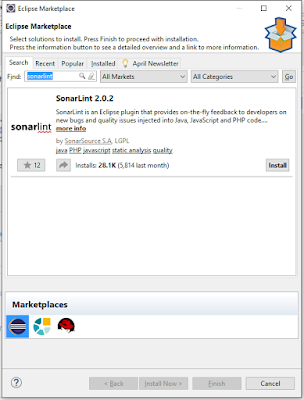
  • This plugin is also available on the eclipse market place
  • You can visit market place and drag/drop the "install" button to  your eclipse IDE. (It will start the installation process for you)

  • Or else inside the eclipse IDE goto "Help" > "Eclipse Marketplace"


  • Type "sonarlint" in the Find: section of the Eclipse Market place and hit enter. 
  • When search result appears, click on the "Install" button.

  • When "Confirm Selected Features screen" appears, select "SonarLint for Eclipse" and "SonarLint for Eclipse Java Configuration Helper" 
  • Then click the Confirm button.


  • When "Review Licence" screen appears select "I accept the terms of the license agreement" radio button and click on the Finish button.

  • Eclipse will continue the SonarLint plugin installation.
  • When it asks to restart the IDE to finish installation, allow it to do so.
  • Once eclipse restarts, create a sample Java project and a sample project as shown below.
CoreJavaDemo (Project)
     |--MySonar (Package)
              |--HelloWorld.java (Class)


  • Right click on the project and select "SonarLint" > "Bind to a SonarQube project"


  • When "Bind Eclipse projects to SonarQube projects" screen opens, select Eclipse project (CoreJavaDemos) and Type a SonarQube project name (which is already existing in SonarQube Dashboard)


  • If "Select a SonarQube server:" dropdown list does not have the localhost as a value, you should configure it with following values. To check whether the server is accessible, click on "Test server" button after providing the below details.
Server name : http://localhost:9000/
User : admin
Password : admin

  • Finally goto "Window" > "Show View" and select "SonarLint Issues" view


  • Now you SonarLint plugin will analyze the source-code which is being developed in the eclipse project and notify issues in real-time. (A Summary of issues will be displayed in SonarLint issues view)


Continues Inspection with SonarQube / Sonar plugins Part 3

Continues Inspection With Sonar (The Sonar Way)

Part 1 Part 2 > Part 3 Part 4

Analyzing JAVA Projects with Maven

(Please note that in-order to perform this step in a simple manner, SonarQube server should be running in the default port  - localhost:9000. If it is not, additional maven configurations needs to be done as well)

Analyzing maven project for SonarQube is easy. Only a few simple steps need to be followed in order to perform this analysis. 
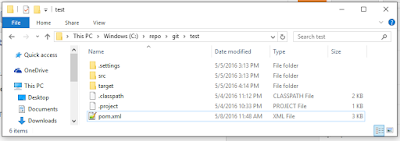
(If you do not have a maven project, please download following test project and extract to a preferred location)

  • Open a command line (Run > Type "cmd")
  • Goto the java maven project folder. (Where the "pom.xml" is located)

  • Type "mvn sonar:sonar" and hit enter. (Maven will start analyzing the project)


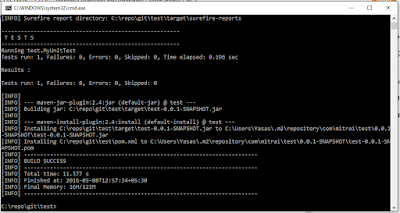
("Build Success" message at the end of analysis confirms the analysis has completed successfully)

You should now be able to see your java project in the SonarQube dashboard.


Analyzing Unit Test Results/Code Coverage for JAVA Maven Projects

(Please note that you must include a set of plugins in your pom.xml to analyze the code coverage. 
E.g : "junit", "maven-surefire-plugin", "sonar-jacoco-listeners")

If you do not have the "junit", "maven-surefire-plugin", "sonar-jacoco-listeners" plugins in your pom.xml, simply copy and paste the same plugins from the following pom.xml. 

  pom.xml
<project xmlns="http://maven.apache.org/POM/4.0.0" xmlns:xsi="http://www.w3.org/2001/XMLSchema-instance" xsi:schemaLocation="http://maven.apache.org/POM/4.0.0 http://maven.apache.org/xsd/maven-4.0.0.xsd">
  <modelVersion>4.0.0</modelVersion>
  
  <groupId>com.mitrai</groupId>
  <artifactId>test</artifactId>
  <version>0.0.1-SNAPSHOT</version>
  
  <name>Java :: Mitrai-TestProject :: UT Coverage with JaCoCo</name>
  
  <properties>
    <project.build.sourceEncoding>UTF-8</project.build.sourceEncoding>
  </properties>

  <dependencies>
    <dependency>
      <groupId>junit</groupId>
      <artifactId>junit</artifactId>
      <!-- Minimal supported version is 4.7 -->
      <version>4.11</version>
      <scope>test</scope>
    </dependency>
  </dependencies>  
  
  <build>
    <plugins>
      <plugin>
        <groupId>org.apache.maven.plugins</groupId>
        <artifactId>maven-compiler-plugin</artifactId>
        <version>3.3</version>
        <configuration>
          <source>1.5</source>
          <target>1.5</target>
        </configuration>
      </plugin>
    </plugins>
  </build>
  
  <!-- BEGIN: Specific to mapping unit tests and covered code -->
  <profiles>
    <profile>
      <id>coverage-per-test</id>
      <build>
        <plugins>
          <plugin>
            <groupId>org.apache.maven.plugins</groupId>
            <artifactId>maven-surefire-plugin</artifactId>
            <!-- Minimal supported version is 2.4 -->
            <version>2.13</version>
            <configuration>
              <properties>
                <property>
                  <name>listener</name>
                  <value>org.sonar.java.jacoco.JUnitListener</value>
                </property>
              </properties>
            </configuration>
          </plugin>
        </plugins>
      </build>

      <dependencies>
        <dependency>
          <groupId>org.sonarsource.java</groupId>
          <artifactId>sonar-jacoco-listeners</artifactId>
          <version>3.8</version>
          <scope>test</scope>
        </dependency>
      </dependencies>
    </profile>
  </profiles>
  <!-- END: Specific to mapping unit tests and covered code -->
</project>

Also note that having the above plugins will analyze 0 unit tests, if you do not have any unit tests written in your code. (If you are using the test Java Maven project, you shall note there is one Unit test case while its being analyzed.)
  • Open a command line (Run > Type "cmd")
  • Goto the java maven project folder. (Where the "pom.xml" is located)
  • Type "mvn clean org.jacoco:jacoco-maven-plugin:prepare-agent install" and hit enter. (Maven will Prepare jacoco agent to allow coverage report generation, build the project, and execute the unit tests)


  • Type "mvn sonar:sonar" and hit enter. (Maven will start analyzing the project along with the unit test results created from the previous step and publish results in SonarQube dashboard)

SonarQube dashboard should now consist your java project's analysis results along with the the unit test results / code coverage. 


Thursday, April 28, 2016

Continues Inspection with SonarQube / Sonar plugins Part 2

SonarQube Installation and Configuration

Part 1 > Part 2 > Part 3 > Part 4 


The Use-Case Scenario


The use-case is a two step assessment of the source code being developed in a software project for maintaining coding standards, prevention of potential bugs, maintaining an acceptable comments ratio etc.


Step 1 : (Before checking in Source Code)
At the development stage, developer will use SonarQube plugins (Sonar Lint) for real time assessment of his/her code quality. Hence he/she can refactor it before uploading to the main repository.

Step 2 : (After checking in Source Code)
When there is a new commit to the source code repository, whole repository will get analyzed and the results will be displayed in the SonarQube dash board.


Installation

Required : SonarQube (Latest Version) , Sonar Runner (Latest Version)


Configuring System paths


First things first ! Once you have the above tools installed, it is required to set system paths,

Key Value
JAVA_HOME C:\Program Files\Java\jdk1.8.0_25
M2_HOME C:\repo\apache-maven-3.3.9
SONAR_RUNNER_HOME C:\repo\sonar-runner-2.4
Path C:\Program Files\Java\jdk1.8.0_25\bin
Path C:\repo\apache-maven-3.3.9\bin
Path C:\repo\sonar-runner-2.4\bin

(Please note that this table contains sample install locations and the Values for the system paths should be pointed to the exact installation locations.)


Configuring the Databse


(Though it's possible to work with the embedded H2 database in the SonarQube server, it is recommended to configure separate database before running analyzes)

Just download and run the following .sql query in the mysql console. 

create_database_and_users.sql

Which will create,
A Database as             : sonar
An User as                  : sonar
An User password as    : sonar


Configuring Sonar Analyzer


Just download and replace the following files in the given locations,

sonar.properties

Copy and Replace in  - C:\repo\sonarqube-5.4\conf\sonar.properties

sonar-runner.properties

Copy and Replace in  - C:\repo\sonar-runner-2.4\conf\sonar-runner.properties

 (It is assumed that MySQL server installed locally in port 3306 and database name, user, password is set to value "sonar". If it is not, kindly open the copied files and perform changes where necessary)


Running SonarQube Server


Visit C:\repo\sonarqube-5.4\bin\ folder and run the StartSonar.bat or sonar.sh to start the SonarQube server.

E.g. : Windows OSx64 - C:\repo\sonarqube-5.4\bin\windows-x86-64\StartSonar.bat
          Linux OSx64 - /home/Documents/repo/sonarqube-5.4/bin/linux-x86-64/sonar.sh


Once the server is up and running, visit URL http://localhost:9000/. You shall see the following screen.


Whenever you get to see the above message, you should configure sonar qube (if you are the administrator for SonarQube Server). In order to do so visit http://localhost:9000/setup and click on "Upgrade" button.


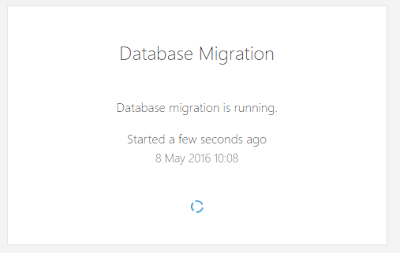
Then the following screen will appear and you should give it some time to run updates on the database server.


Once it finishes the update it will automatically be redirected to http://localhost:9000/ (You should see a screen similar to the following snapshot)


Next and  final step will be to try logging in to the SonarQubeServer as the administrator. For that, use following credentials,

user name  : admin
password   : admin


If the above screen appeared (with user name as "Administrator" on the top-right corner), which means you have finished configuring SonarQube server.


Hoooooooooooooooorah !!!!


If you want to analyze your source code straight away > Part 3 - Continues Inspection With Sonar (The Sonar Way)
If you want to configure Sonar Plugin for eclipse > Part 4 - Sonar Plugin Installation and Configuration for Eclipse IDE

Things to be learned before learning Load Balancing

Network Layers (Keep in mind when working with diffrent protocols) Difference between HTTPS and SSL SSL (Secure Socket Layer...